
If you need to turn raw video into a clean, professional clip but feel lost in complex tools and slow software, you’re not alone. Many beginners struggle with confusing interfaces, slow exports, and messy project files that make editing take much longer than it should.
This article fixes that. It walks you through what Adobe Premiere Pro is, what it can do, how to set it up on a Windows PC, and the practical steps to edit, export, and solve common problems, all in easy language so you can start editing confidently.
What is Adobe Premiere Pro
Adobe Premiere Pro is a professional video editing program used to cut clips, add effects, fix color, and export finished videos. When people search for the keyword “Adobe Premiere Pro,” they mean this Windows app for creating everything from short social clips to long films. It is widely used because it supports many formats, works with other Adobe apps, and handles professional workflows.
Installation & Setup
This tells you how to get Premiere Pro and set it up simply. If you prefer not to search for installers yourself, our article includes a download link, you can download directly from there.
- First, go to our website and open the download link provided in this article.
- Next, click the Download button on the page.
- Save the installer to a folder you can easily find.
- Run the installer and follow the on-screen steps.
- If asked, sign in with your Adobe ID or create one.
- After installation, open Premiere Pro and create a new project.
System Requirements
Here’s what your PC needs so Premiere runs well. These are general guidelines so you can check your machine. Minimum and recommended basics to expect:
- Operating System: Windows 10 (64-bit) or Windows 11 (64-bit).
- Processor: Dual-core CPU (min); quad-core or better recommended.
- RAM: 8 GB minimum; 16 GB or more recommended for HD; 32 GB for 4K.
- GPU: Dedicated GPU recommended (2 GB VRAM min; 4+ GB recommended).
- Storage: SSD for program and cache; plenty of disk space (50 GB+).
- Display: 1920×1080 or higher recommended.
- Internet: Required for activation and some features.
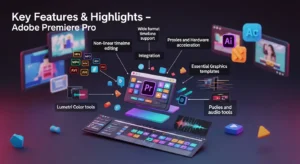
Key Features & Highlights
This section explains the strongest tools Premiere Pro gives you, so you know what it can do for your projects.
- Non-linear timeline editing for fast arranging and trimming.
- Wide format support (MP4, MOV, AVI, and many codecs).
- Built-in color correction and Lumetri Color tools.
- Powerful audio tools and basic mixing directly in the app.
- Motion graphics via Essential Graphics and MOGRT templates.
- Support for proxies and hardware acceleration to speed up editing.
- Integration with After Effects, Audition, and Adobe Media Encoder.
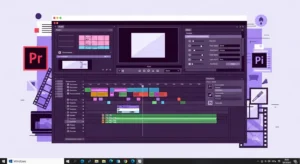
Workspace & Interface Overview
Premiere uses panels: Source, Program (preview), Timeline, and Project. Learn where clips, effects, and timelines live, and then you won’t feel lost. Use the Assembly or Editing workspaces for simple editing, and switch to Color or Audio for finishing touches.
Importing Media & Project Organization
Good organization saves time. Start by making bins (folders) in the Project panel for footage, audio, graphics, and exports. Rename clips with clear names and use metadata or labels to keep large projects tidy.
Timeline Editing Basics
Drag clips from Project to Timeline to build your sequence. Use the Razor to cut, Selection to move, and Ripple Delete to close gaps. Trim using the ends of clips or the trim mode for precise cuts. Learn a few keyboard shortcuts (J, K, L for playback; C for razor) to speed up editing.
Transitions, Effects & Filters
Use transitions sparingly; a simple dissolve or cut is often best. Effects are in the Effects panel; drag to a clip and tweak parameters in Effect Controls. Save frequently used setups as presets.
Color Correction & Grading
Premiere’s Lumetri Color panel lets you fix exposure and color fast. Start with Basic Correction (white balance, exposure), then use Creative for looks, and Curves for fine control. Scope overlays (Waveform, Vectorscope) help match shots.
Audio Editing & Mixing
Good audio is as important as good video. Fix background noise, use the Essential Sound panel to label dialogue/music/sfx, and mix levels so the voice is clear. Export with AAC or WAV, depending on need.
Titles, Text & Graphics
Use the Essential Graphics panel to create titles and lower thirds. You can import motion graphics templates (MOGRTs) for quick, professional-looking text animations.
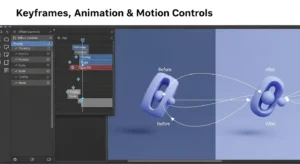
Keyframes, Animation & Motion Controls
Keyframes let you animate position, scale, opacity, and effect settings. Add keyframes in Effect Controls and ease them for smooth motion. This is how simple animations and pans are made.
Masking, Compositing & Layering
Masks hide or reveal parts of clips for focused color work or effects. Use blend modes and stacking to composite clips. For advanced compositing, export to After Effects when needed.
Performance Optimization
If your PC is slow with large files, proxies help by using lower-resolution temporary files while you edit.
- Use proxies for 4K/large files; Premiere will switch back to full files at export.
- Store media and cache on an SSD for faster reads/writes.
- Lower playback resolution (1/2 or 1/4) while editing.
- Close other heavy programs while editing.
- Enable GPU acceleration (Project Settings → Renderer).
- Clear media cache if you see odd behavior.
Rendering & Exporting
When your edit is ready, go to File → Export → Media. Choose a format (H.264 for web, HEVC for smaller files, ProRes for high quality). Use Adobe Media Encoder for queued exports and to keep Premiere free for editing.
Plugins, Extensions & Templates
Premiere supports plugins for extra effects, codecs, and workflow tools. Templates (MOGRTs) speed up titles and lower thirds.
- Install plugins from trusted developers only.
- Use templates to keep brand style consistent.
- Check compatibility with your Premiere version before installing.
Troubleshooting
If Premiere crashes, won’t export, or shows missing files, try these quick fixes: restart, clear media cache, relink missing files, update GPU drivers, and check disk space. Save project backups often (File → Project Settings → Auto Save).
Pros & Cons
Pros
- Professional feature set for editing, color, and audio.
- Strong file and format support.
-
Good integration with the Adobe suite.
Cons
- It can be slow on low-end PCs.
- Subscription pricing may not suit everyone.
- Some tasks are advanced and need time to learn.
FAQs
Is Premiere Pro good for beginners?
Yes, it can be used at a basic level quickly, but advanced features take practice.
Can I edit 4K on an ordinary laptop?
You can, but expect slower performance; use proxies and an SSD.
Do I need other Adobe apps?
Not always, but After Effects and Audition help with motion graphics and advanced audio.
Conclusion
Adobe Premiere Pro is a full-featured video editor that fits basic edits to professional projects. This guide explained what it is, its main features, what your Windows PC needs, how to install and download (use the download link on this article to get the installer), and the key steps for editing, color, audio, exporting, and fixing common problems. Start with organized projects, use proxies if your PC is slow, and practice the timeline basics and color tools — you’ll see big improvements fast.